review
How to keep the community informed about your activities
Comparison of tools to manage small ads and keep your users informed (and happy).
I have already reported here my search for a bulletin board for the blog. In the end, I ended up realizing that I also needed a way to interact with my communities, so it was desirable to give users a voice. Thus, I needed the famous forum, which is why I ended up choosing the Gitter .
 Henrique Costa
However, there is a similar demand, boiled down to the need for disclosure without public interaction with users. I would name such use "microblog", if it did not already belong to another type of tool. This is what is known, in the developer world, as "changelog". Let's see what are the main tools in this market.
Or Headway It is a very simple changelog tool, which perfectly meets the demand for spreading news about your product (or whatever you most want to promote). The app provides options for Publish the changelog to a standalone page or directly to a widget , displayed within your blog or app.
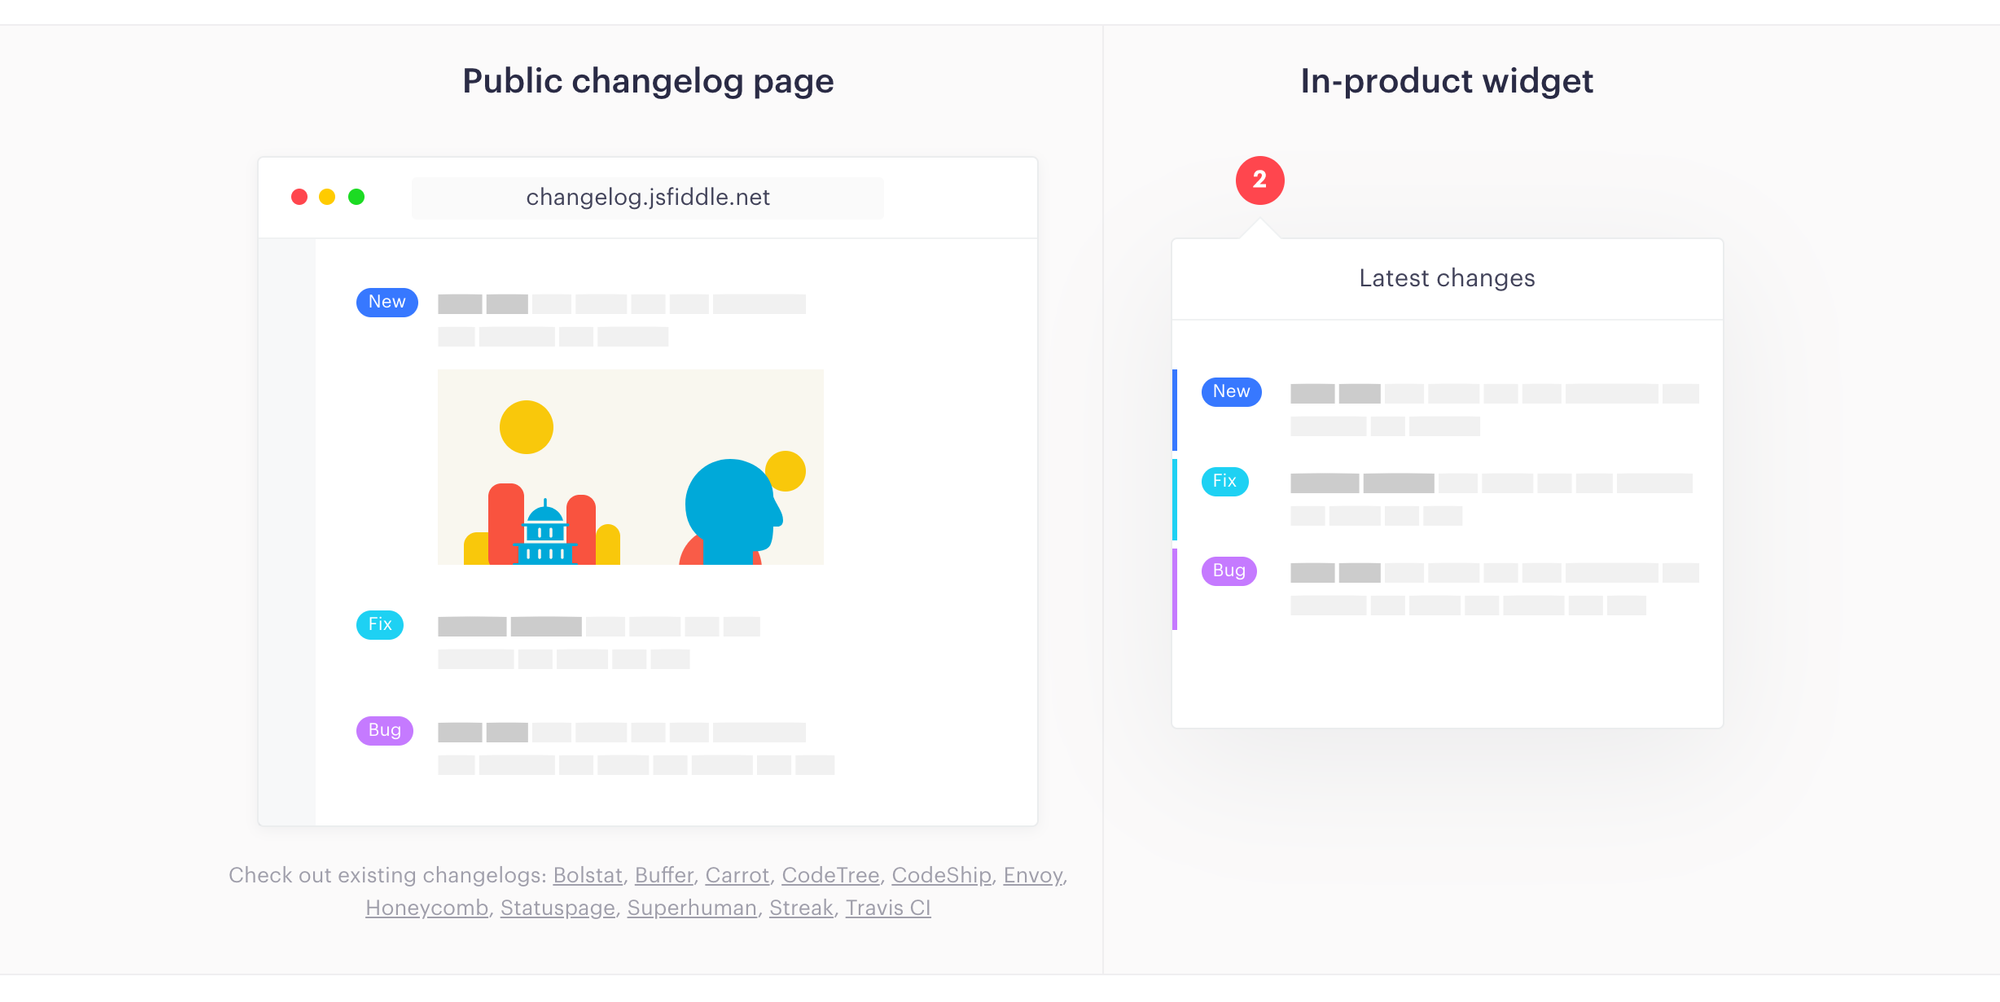
It's what I would call a "root experience" For two reasons: the post is written in markdown and the customization of the widget is limited. The paid plan (USD 29/month) also offers: whitelabel, publication on your domain, integrations, among other features. So, overall, the free plan is more than enough to fulfill the mission of publicizing your activities.
A good alternative to Headway is Announcekit , which has many more customizations in the widget, in addition to being aimed at a wider audience. While changelog tools are originally geared toward developers, there are adaptations to serve marketing and product teams.
This is precisely the case with Announcekit, that included feedback and email notification functionalities in its solution . In terms of price, Annoucekit has a similar plan to Headway for a better price ($19/month). But to use the marketing tools, you need to choose a more expensive plan (starting at USD 49/month). That is, it is cheap for developers and expensive for marketers.

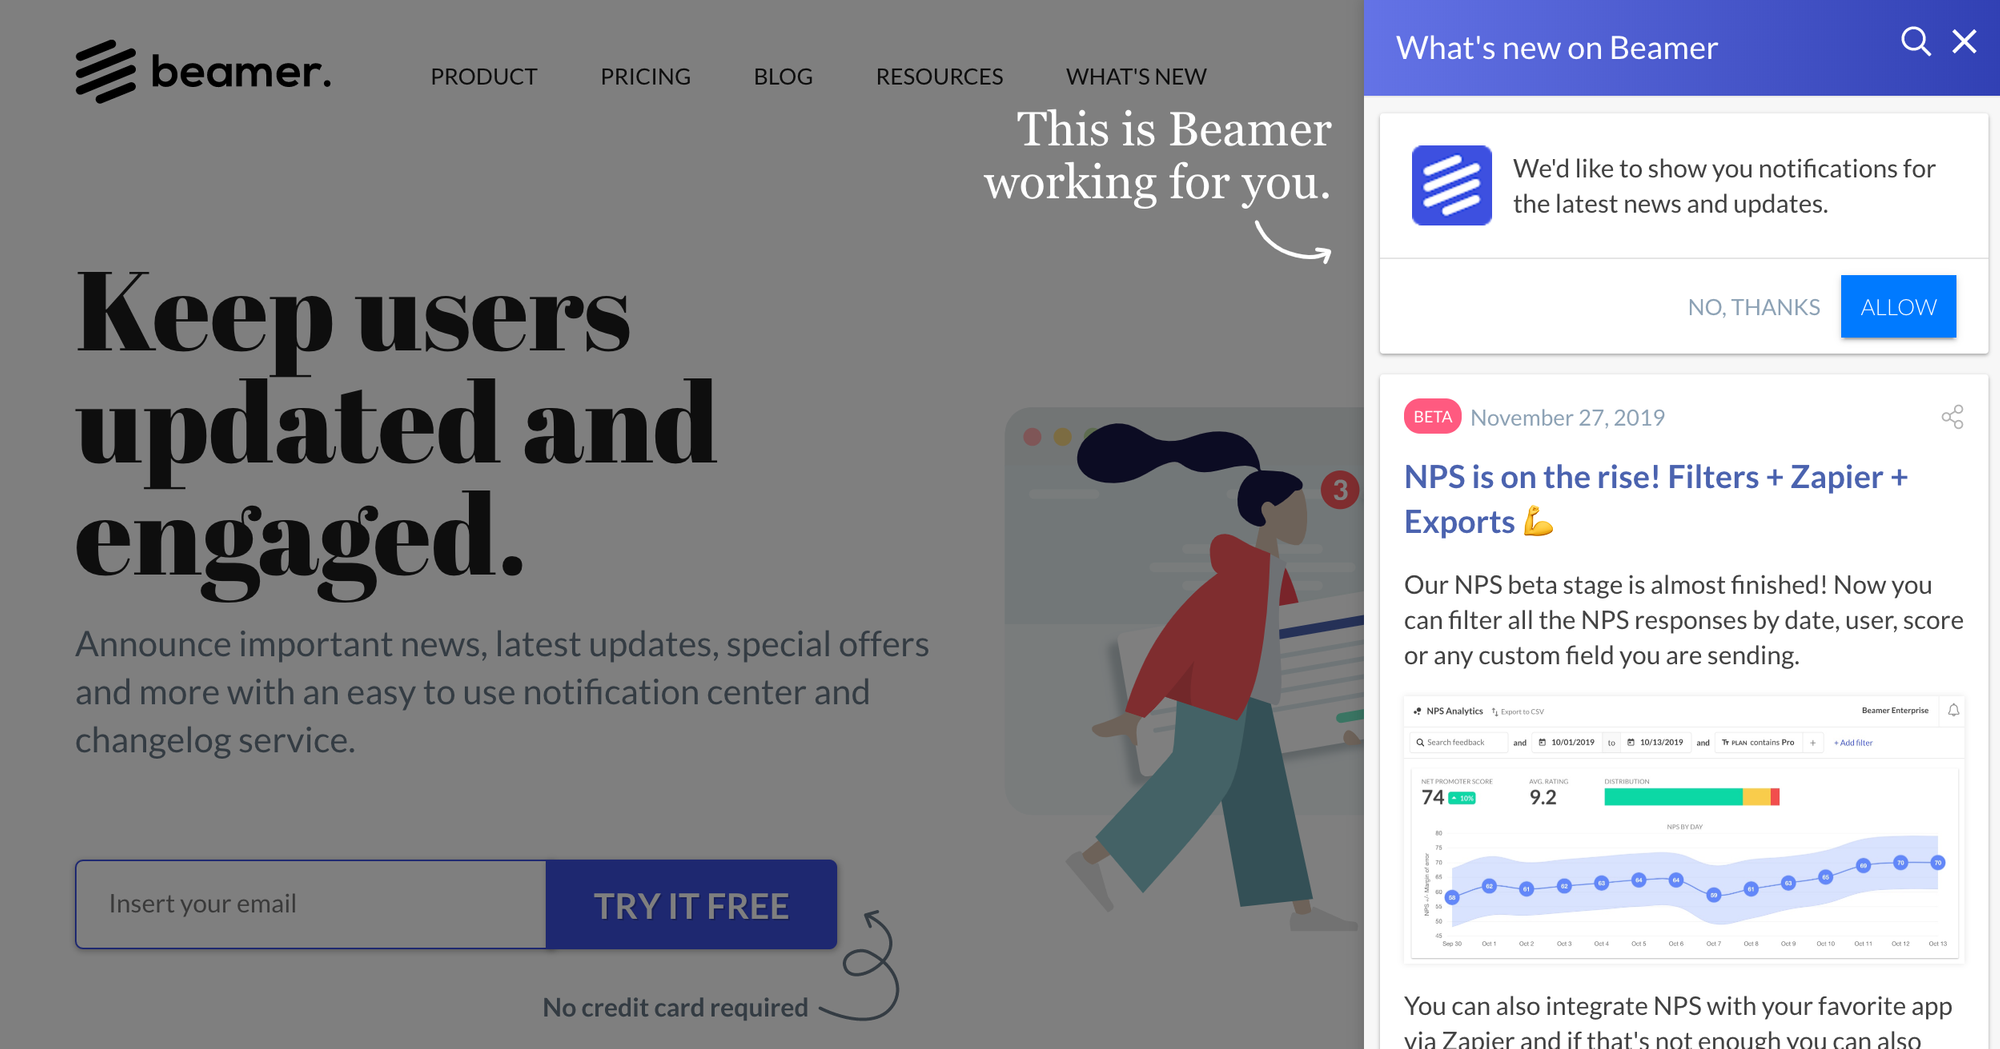
From what I could see, Announcekit is competing directly with Beamer . The biggest difference I found was that Beamer doesn't offer an affordable starter plan, but only charges in the most expensive ranges, with features very similar to those of Announcekit. In fact, even visually the competitors are very similar.
Another competitor to be mentioned is the Noticeable . Since it seems to be the only one that limits the free plan to one project, I haven't delved into the tool. Finally, there is the ReleaseNotes , which has a business model based on the number of subscribers to your changelog. Since it starts at $14/month, I also didn't thoroughly evaluate the app.
That is Competition has organized itself into an increasing line of complexity and price , in the following order: changelog, announcements (releases and announcements in general), notification center, user segmentation, feedback, push notifications, design customization, and integrations with marketing tools.
Personally, I think that if you don't need anything too complicated, Headway is a good option for small ads . But, if you're looking to expand your fulfillment of marketing demands, Announcekit seems to be the most flexible, as it has the most price ranges and features. That way, you'll only pay for what's important, when and if the need arises.
How to share videos on your blog in an (almost) professional way
Second part of the text on how to capture and share videos on your blog.
In the previous post, I evaluated some options to capture and share videos in a simple way on your blog. You might want to take a look at it before jumping into the current discussion:
Henrique Costa 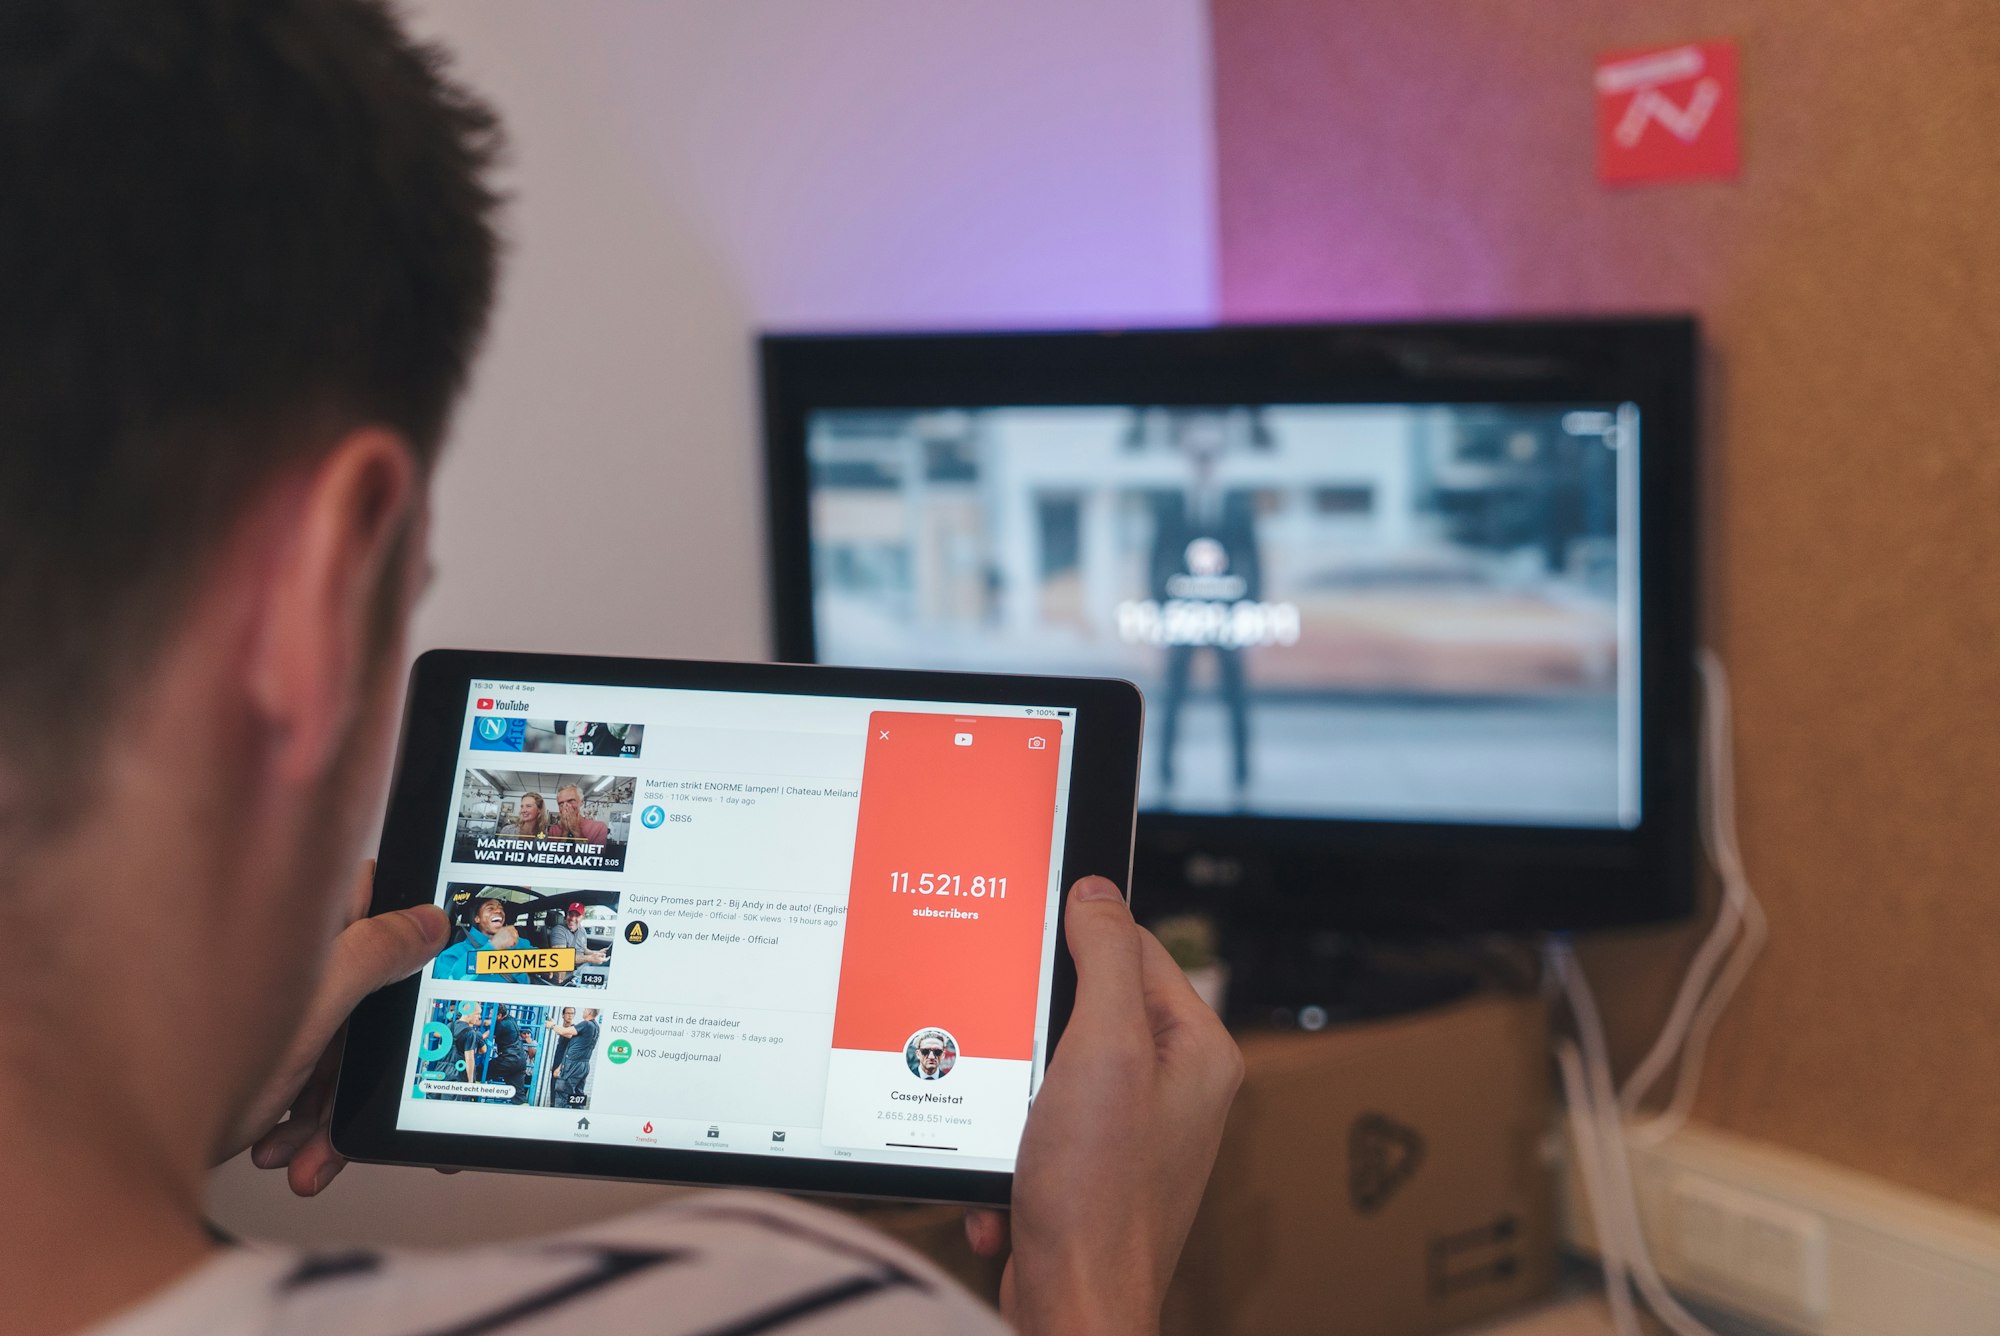
Essentially, the options that make video sharing simple are made up of chaining each of the following tasks: Capture, edit, store, and share . The apps I dealt with in the last post are a kind of package of all these functions. However, each task can be handled separately and, as far as storage is concerned, there are several possibilities.
Several services offer cloud space and that is why Each of us already has abundant "disk space", distributed across several accounts . The fact is that today storage is the most abundant and cheapest part, although it is a little more difficult to find an interface with a good experience so that the user can take advantage of what they already have.
Given this, I will not look here for the best storage solution, but the best management experience for it. If you're a Mac user, that's where the Dropshare , which is a small paid app ($25.99). Your goal is to connect the menu bar with your preferred cloud storage account. Simply drag the file to be uploaded to the cloud to the Dropshare shortcut and then copy the generated link in the cloud of your choice.

If you prefer to use Dropshare's own cloud, the service offers a free monthly plan of 1 GB of data transfer, limited to storage of 512 MB.
Dropshare is therefore a Cloud space power interface provided by various sources , including the possibility of using Dropshare's own cloud. Generally, the app competes with companies that are in the field of file sharing. But for our use case, what really matters is storage, since the display of the content will happen through the blog - and not, for example, by sending the link by email.

It is true that Dropshare has numerous competitors in the market and the Sweet Setup published a great comparison on the subject. But there is a detail, consistent in that, for the publication of the captured video on the blog, you will need the link to the file, which will end with the extension ".mp4". This is the link to the file displayed in a raw form , fully transparent so that it can be presented as an "embed". It is nothing more than a window, within your blog, through which the user will see the captured file.
Unfortunately, not all providers offer the link in this format and it is essential so that you can display the video directly on your blog without interference. For this you have a few options. If you choose Google Drive, the generated link gives you the option to copy the iframe, which is the line of code to be inserted into the blog. In other words, Google does not prevent the dissemination of files hosted on its network and even facilitates this task, by publishing the code that facilitates integration with the blog (which is precisely the embed).
If you choose Backblaze, in the free plan, the generated link gives you the option to copy the address of the file so that you can prepare the link yourself for insertion in the blog. It is either possible to search for the "direct link" from Dropshare itself, or to open the "standard link" generated by Dropshare . In the latter case, when clicking on the video, the option to copy the address of the file will be displayed, a path that is displayed in the following video:
If you're a Windows user (and don't have Dropshare at your disposal), I imagine that the Cyberduck (R$ 89.90) also solve, as it has a similar proposal for managing cloud space from several providers. To make the experience even more fluid, Mountain Duck (R$ 149.90) offers a number of advantages, at a higher price.
But At this point, we are already moving far away from the problem to be solved , since such tools are actually aimed at a more technical use. For a more detailed comparison of FTP clients, see the blog post BinaryNighsts .
Resuming the thread, we were looking for a customer to easily upload files to the cloud.
We came up with Dropshare as a solution to improve the experience of uploading files to the cloud, leaving the user's choice of their favorite storage service. Then, we considered FTP clients, which are professional solutions precisely for this type of demand. The tendency is for these solutions to be paid.
But, if budget is too tight and you want to forgo some convenience, there are even more sophisticated service providers that don't charge anything to meet the needs of an "average blogger." These are companies whose mission is to distribute content through a complex network of servers, in order to optimize the speed and quality of this delivery.
Here's an example of video served via Cloudinary , in which the sophistication in the treatment of images is demonstrated, which includes transformation, processing, optimization and distribution across a complex network of servers to improve the performance of your application:
A competitor to Cloudinary, also focused on storage, is the Imagekit , whose free plan offers 20 GB of bandwidth per month. This type of company allows itself to offer free plans for data traffic with generous franchises, because the service they provide is not quite that, but a refinement in the way they transform and distribute such data.
In conclusion, it is clear that we are comparing completely different solutions, as the evaluation started with applications that do from capture to hosting, and in the end generic solutions for cloud file management are being compared. They are completely different problems, although the applications mentioned can be used for the same purpose .
I could also conclude in another way: since Loom is exactly what you need to capture and distribute videos in an agile way, they are sure to build a business model that will make you pay for it. If you seek to stay on the sidelines of the business model, using the service for free, you will need to move a little away from the purpose for which the software was developed. The further you go, the cheaper - and more complex - the solution will become.
This seems to be a fairly universal and predictable rule. In my case, I chose to stick with Loom for disposable videos, CloudApp for occasional use (as the free plan is very limited), and Dropshare as the ultimate solution. Anyway For me, the most important thing is a seamless experience when sending files to the cloud , which is precisely the problem that Dropshare sets out to solve.
How to Capture and Share Videos on Your Blog Easily
First part of the text on how to capture and share videos on your blog.
There are several video formats, with different purposes. For my use, I usually share screenshots (screen record), because My goal is to produce demo videos or tutorials . This requires a solution that captures the screen (and sometimes also the webcam), as well as has minimal video editing capabilities. So I mean that if you are looking for a robust video editor, this kind of solution is not suitable.
In addition, when it comes to screen capture, it is very convenient for the application to provide a video hosting and distribution service. It is also desirable, although not essential, that it offers collaboration with your colleagues and work and interaction with the public. And finally, for my need, it is very important that the distribution of the video has a professional look, without too many ads and that it works in harmony with the design of my blog.
As you can see, in the journey of solving this problem, there is a production cycle that goes from capture to sharing. And the type of application we are evaluating is precisely the one that, preferably, covers all these phases. Like this What would be the best way to produce and share this type of video?
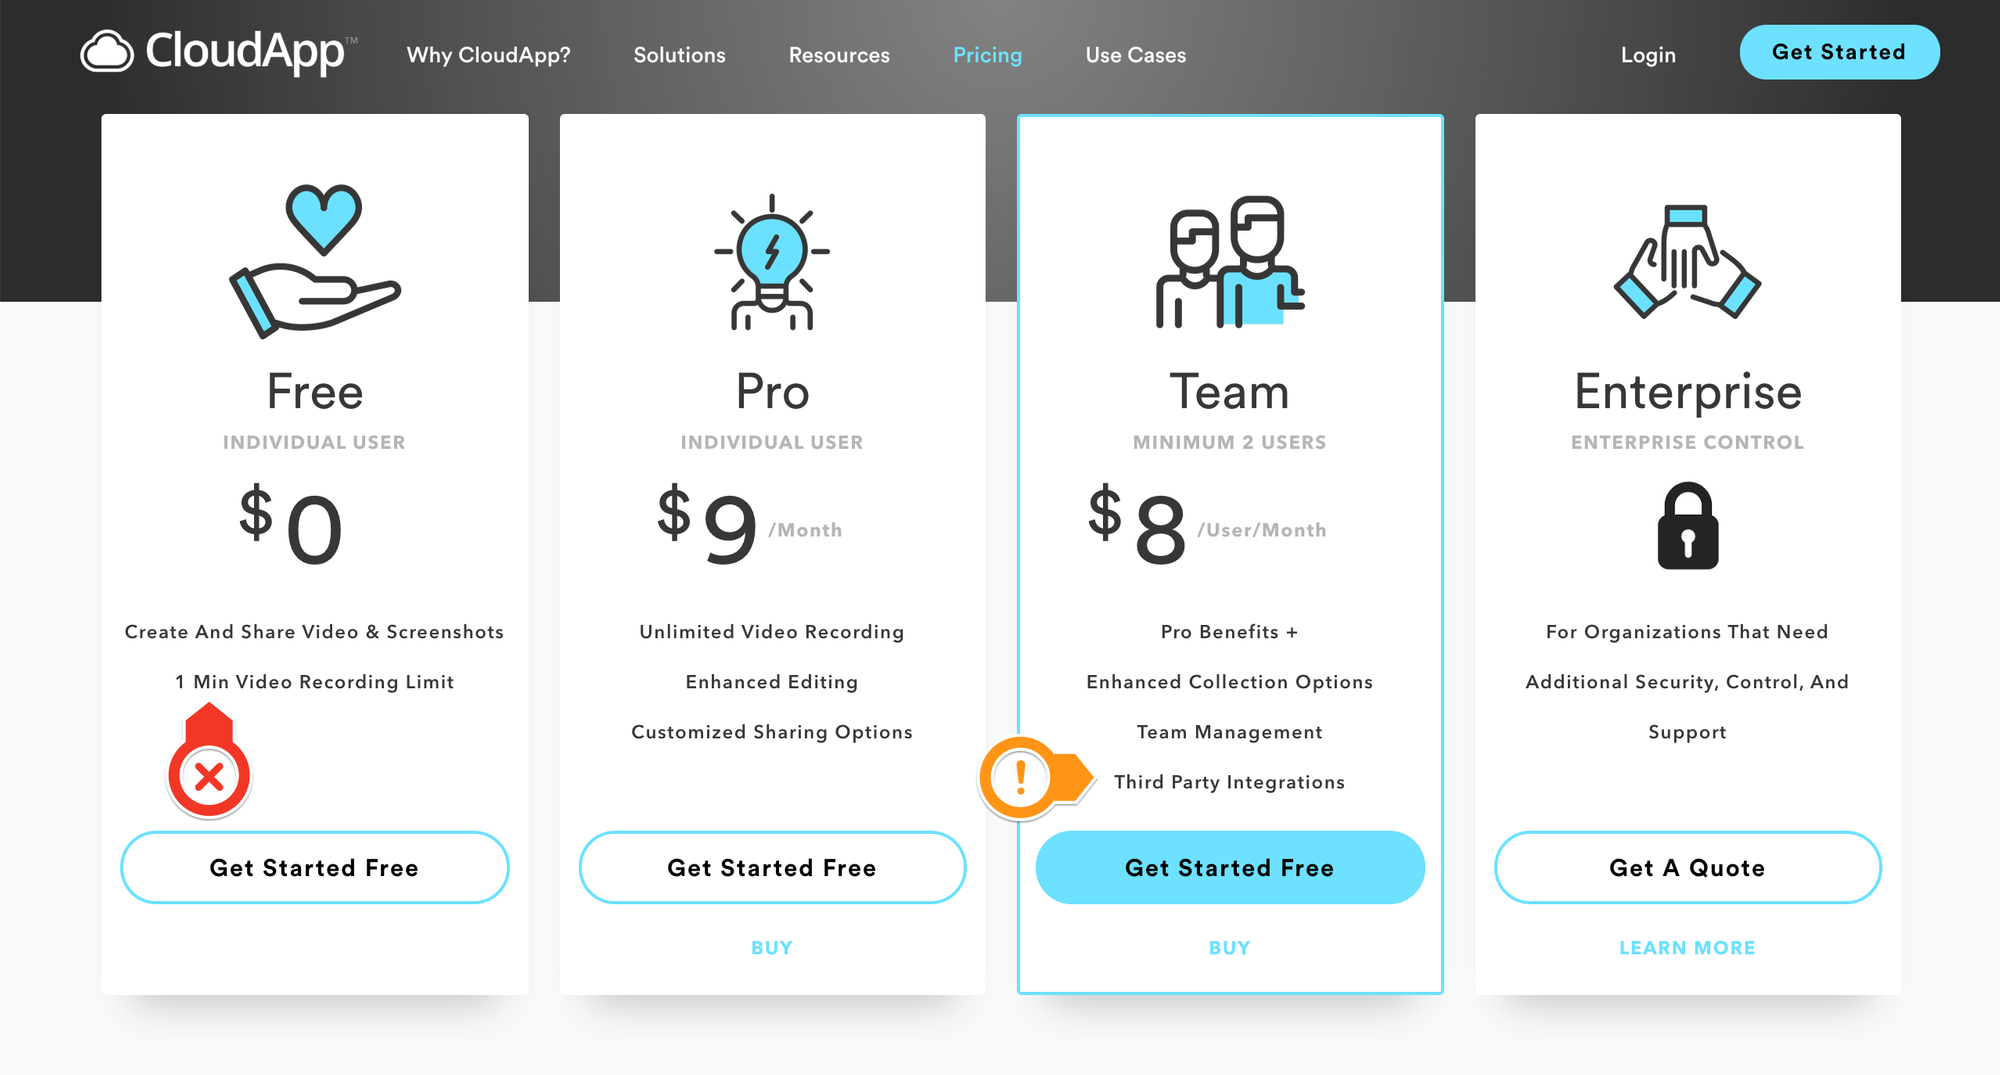
For short videos, you can use the free version of the CloudApp . But if your video is longer than 5 minutes, you'll need to subscribe to a paid plan. Ironically, CloudApp's promotional video is not hosted on its servers, but on YouTube. This is a symptom that, although CloudApp serves for content distribution, this is not its primary purpose.
According to CloudApp's proposal, they seek to solve communication problems of designers, developers, executives, marketers, as well as sales and support teams. Your promotional video illustrates this type of use case, demonstrating communication between two people on the same team, discussing a way to enhance the display of a digital photo.
Basically, what the app aims to do is to facilitate visual communication, integrating various media into the communication channels that the team already uses . In other words, CloudApp was not designed to be the "engine room" of your blog, although it has features that allow you to perform this function. The prices and features offered confirm this, as CloudApp seems to have its audience paid precisely in the teams that want to integrate, for greater productivity, the management of the captured content with the sales or support software they already use.
Another advantage of CloudApp is that it allows you to share, in addition to videos, also GIFs and images. It also offers annotations of captures within the application itself, making CloudApp a very complete solution. Another advantage is that, even on the free plan, CloudApp's player is discreet and integrates very well with any blog.
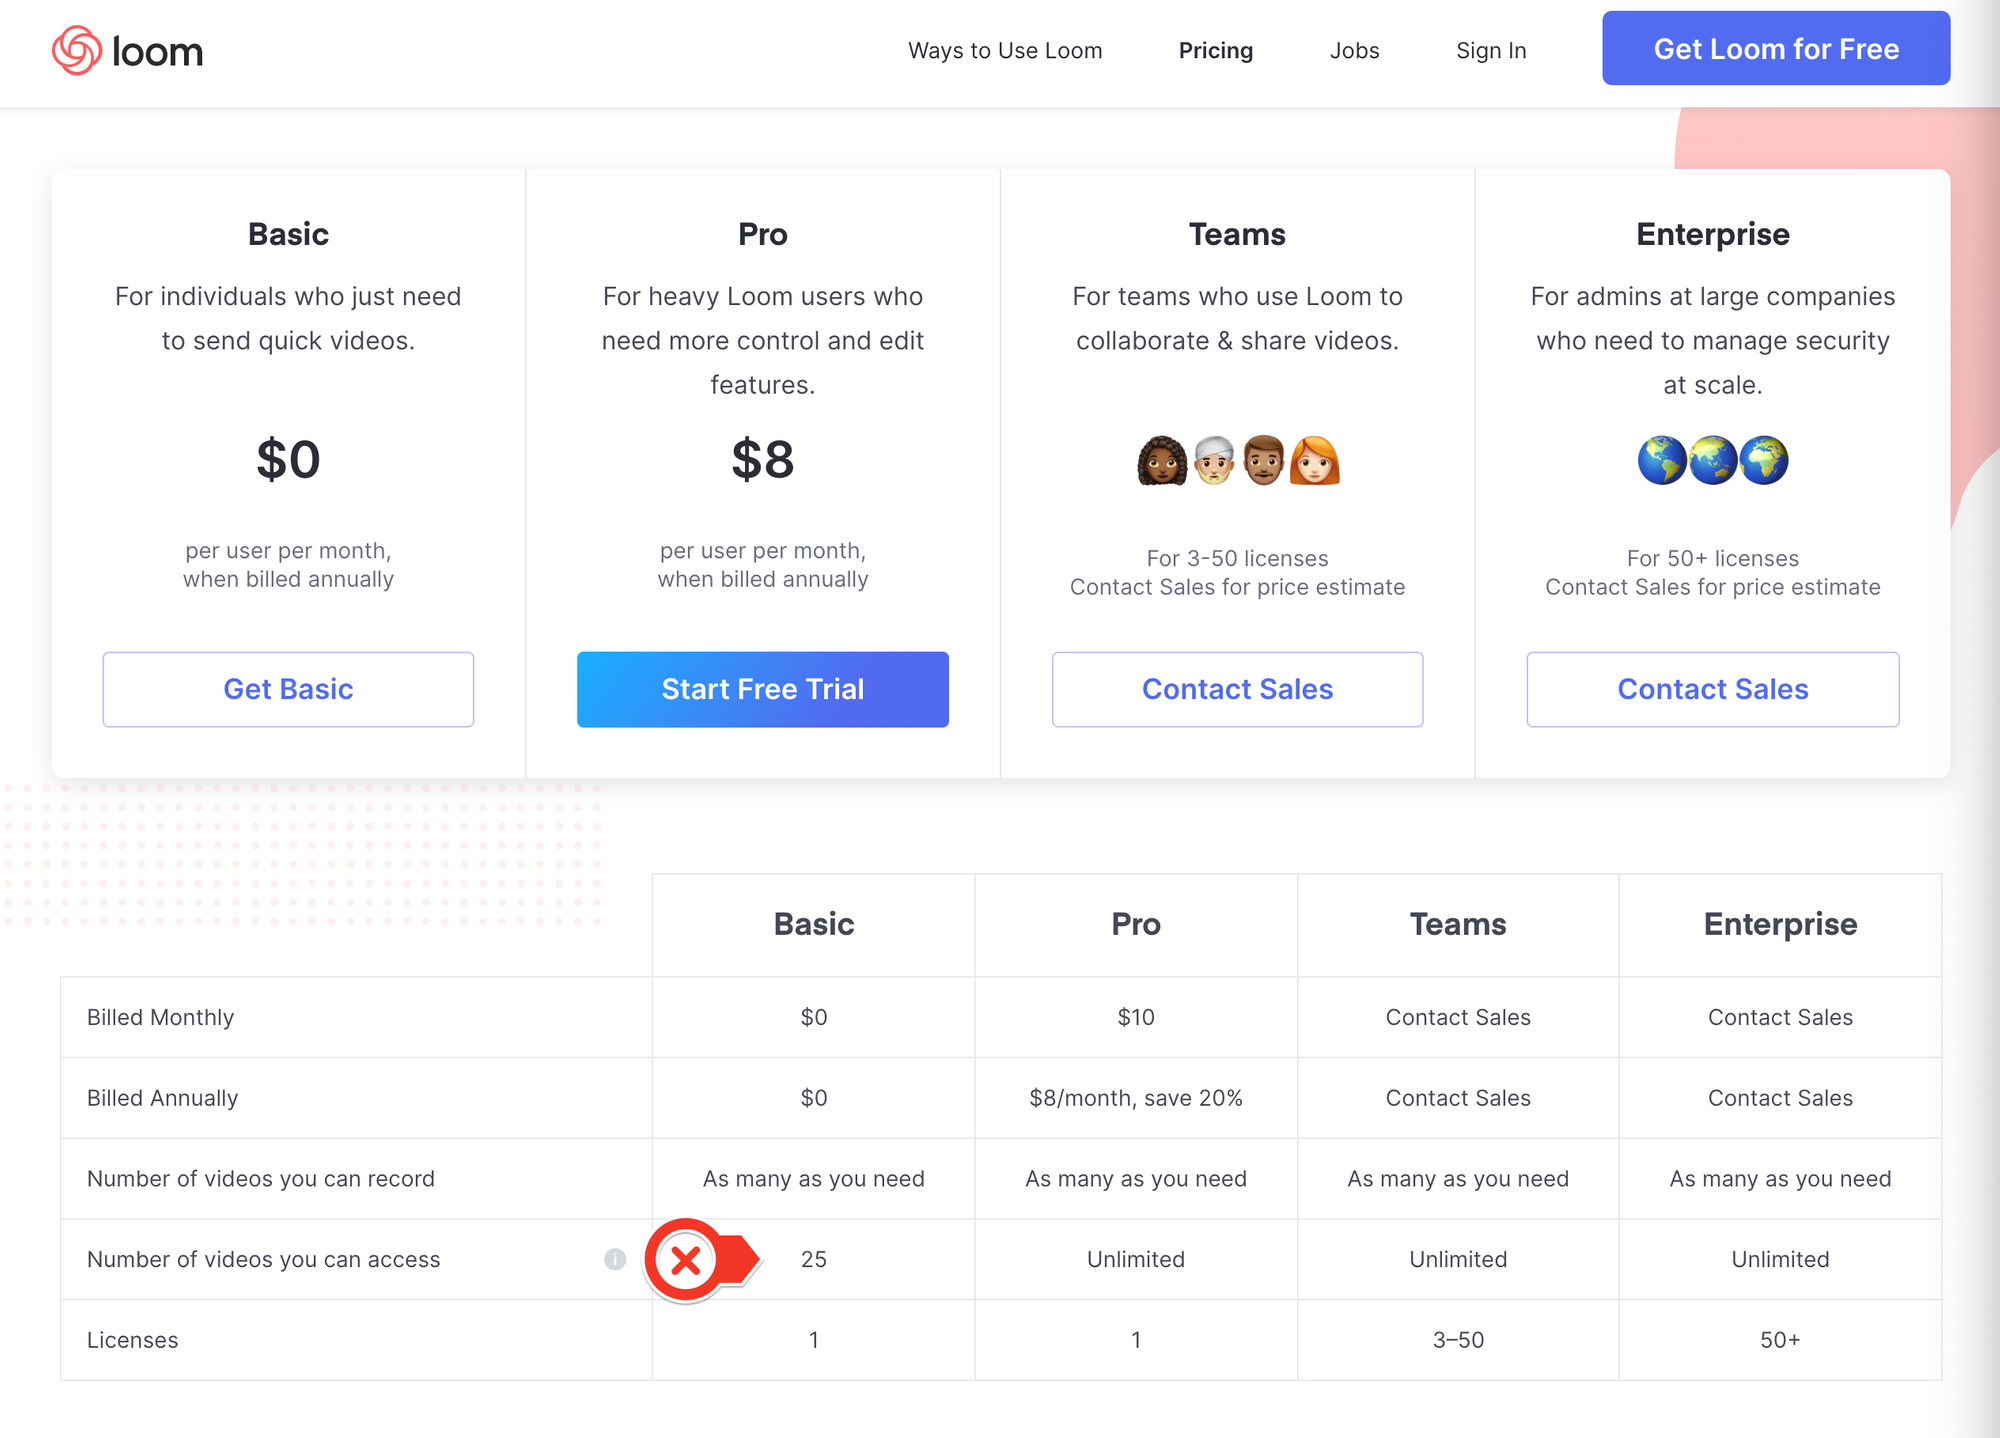
While CloudApp has a complex pricing model based on the length of the videos, the customization of the player so that it becomes fully compatible with your blog, the type of integration available, and the number of captures (up to 25 per month), CloudApp Loom It has a different and simpler approach. While Loom doesn't limit the length of each video on the free plan, it archives your oldest videos, allowing you to only watch the 25 most recent videos.
This coincidence is even curious: while CloudApp only allows 25 new captures per month, Loom only allows access to the 25 most recent captures.
That makes Loom, in my case, an option for disposable videos . Whenever I need to send someone a video that is very fast and doesn't need to be available for a long time, Loom is the first alternative, as this is fully compatible with the one offered in the free plan.
So, if the video needs to be available for a long period of time, I choose to publish it to CloudApp. In fact, the amateur production of Loom's videos itself shows well the company's proposal, which is to make videos with agility, without focusing on refining the production. And here is no criticism, because The company's honest stance for the pursuit of agility, not refinement, is fully compatible with the problem it sets out to solve .
CloudApp and Loom aren't the only options, as you can see in this comparative prepared by the Zapier team. But, even though the comparison is quite complete, I think it is worth adding other possibilities - less obvious - and justify the reasons why they are (or are not) in my preference.
In fact, several people have commented to me that they like the Soapbox , developed by Wistia. One small problem is that Soapbox requires you to appear in the webcam video as well, but we don't always want that. It is true that later you can hide the webcam capture, but You won't be able to easily integrate video into your blog . And for my use, that's a huge problem.
Such limitations make total sense if we evaluate the global strategy of the Wistia , which seems to consider Soapbox as a promotional product. In my view, Soapbox does not exist exactly to generate revenue, but to generate customers for its corporate solutions, which are much more expensive and robust.
Another possibility is to take the screenshot with any software, possibly a free application that already comes on your computer, then distribute the video to the most popular channels: YouTube or Vimeo . In fact, this would even be the expected behavior of someone who has a personal blog. Any solution that deviates from this implies bringing a complexity that the author needs to face.
In my opinion, the recommendations that appear at the end of the video on YouTube and Vimeo induce the audience to leave the blog and compromise the experience as a whole. After all, that's what ads are for. If you want to avoid this noise (which can be represented by a cute puppy as a suggestion at the end of the video 🐶), you can customize the Vimeo player, as long as you are on the paid plan.
If you just want to distribute your video, without any commenting or social media tools, the paid account of the Streamable It's a possibility. The tool is exactly for this and is very easy to use. However, if your account is free, it's good to remember that ads will be posted on your video. Personally, I didn't have a good experience with Streamable, as the video definition was lower than ideal for my case.
This makes me assume that a good part of Streamable's audience is not only people who want to distribute their videos, but who wanted to do so without worrying about the restrictions (e.g., copyright) typical of the big platforms. After all, you don't need to have a Streamable account to post your video, so your post can be anonymous.
Here ends the first part of this evaluation , which will continue soon. In the next step, I will compare the options more focused on cloud file management, which requires the use of at least two applications: one to capture and one to share the captured content.
Henrique Costa 
Working is hard enough. Imagine being accountable... and work. But it is a routine in which we need to invest so that our work is, at least, more seen by colleagues. And this is also important for the improvement of teamwork. In this post I give some tips on how it is possible to organize this routine with some productivity tools.
Using Slack as a remote desktop
The following video shows a simplified routine of accountability. I captured the phone with Jibble on the left and the respective team in Slack. Basically, what the video shows is a user (in this case me 🙂) navigating within the Jibble app on the iPhone and selecting: In/Out → In → Confirm In.
As it is intuitive, for the integration to work, the administrator needs to have created the accounts in both Jibble and Slack. Then the administrator needs to invite the team, by email, to be part of each of the systems. Finally, it will integrate the services, inviting the Jibble bot to inhabit the Slack workspace. But really this is only of interest to the administrator.
From the user's point of view, he will only receive invitations, register his passwords and, if he wishes, will also install the applications on the platforms of his choice. Here we are demonstrating Jibble on the phone and Slack on the computer and the captured routine is the one that will record my check-in.
Since the Jibble team is onboarded through Slack, everyone will be notified in their channel that I'm currently working. Look at the notification that appears in the lower right corner of the screen, at the end of the channel's timeline. When you're done, all I need to do is: In/Out → Out → Confirm Out.
Beyond time control: what was effectively done
This simple interaction will generate enough information to know who worked, for how long, and at what frequency. But the system allows you to know much more about the work. Take, for example, another team I have on Jibble, connected to another workspace on Slack. This other team already has an established culture of accountability in more detail.
There a field called "Optional Note/Task" was enabled, in which the user informs what he intends to do when starting his work shift. Likewise, when checking out, the same field will appear and the user will have the chance to comment on whether or not they have fulfilled what they intended to do.
For experienced users, just inform what you managed to accomplish when checking out, and the first registration is dispensable. On the other hand, experience shows that less diligent users simply may not remember to check out, leaving a gap in the system. That's why it's important to get used to also posting what you intend to do when starting the work shift.
It is not the subject of this post, but Jibble has a number of additional settings that we hope the user will discover when using the application. The first feature that the user will notice is that I always schedule an automatic checkout every four hours. The practical effect is that the "forgotten" user will always be marked by the "self-checkout" and will not have the opportunity to record what he managed to accomplish. Naturally, this is a negative point and one that will be recorded for future evaluation. 😇
PS: Did you like it? Want to know more? See the Help do Jibble about checking in without having to install the app.
Controlling someone's time is boring for those who charge and for those who are accountable. In addition, it is an unproductive activity, so the ideal is to integrate accountability with the operation activity itself. The less friction the better. The less the person feels that he is stopping his work to be accountable, the better.
And if you can integrate accountability with a kind of satisfaction for having completed a task, this is also something very desirable to keep your team together and productive.
Creating a culture of accountability
Here comes the title of the text and its dilemma between inspecting or stimulating: timetracking (or preparation of timesheet) is the activity of generating reports for billing services provided by professionals who work by the hour; while the worklog is a simpler activity, whose purpose is to give visibility to the work done. Another name that this activity takes, in its most simplified variation, is status report. The emphasis on these activities varies between monitoring and encouraging participation in accountability.
Especially for people who are not used to working by the hour, the social satisfaction of sharing a completed task may be what was missing to adhere to a way of working that is essential to remote teams.
By this I mean that, in order to create a culture of accountability (by inspecting), perhaps the gateway is a simplified worklog, as a means by which people simply feel that their work is seen and their progress celebrated (by stimulating). If this objective is met, you will be able to improve the workflow and gather more information about the team's productivity, improving the workflow.
This data can inform a better decision when deciding who stays and who has to leave the team. In other words, monitoring the team's progress based on data is not merely bureaucratic. Collecting this information is essential to manage the team itself and know who is doing well and who is not.
The right tool
If we are dealing with time control, we are talking about paid work, which also means that the application will hardly be free.
Overall, a good app for this purpose costs USD 4.00/month/user. It may even be free, as is the Workingon , in which case integrations with your preferred work platform, chat, etc. will not be available. A competitor that promotes itself because it is free is the Supdate . A more mature alternative - and one that goes beyond the motivational worklog - is the Idonethis . As you might expect, Idonethis doesn't have a free version.
If you need a more hourly billing-oriented solution, consider Toggl or the Harvest . Particularly, I really like the selection promoted by the Zapier , in which these two applications are listed as the most suitable.
From my point of view, one of the advantages of investing in a remote time and attendance tool is getting rid of a lot of emails. That's why I don't see the point in investing in a solution that works around email, as is the case with TeamColony or the StatusHero . In fact, it is possible to notice that all the most modern applications are leaving email aside and building their operation based on platforms, such as the Jibble or the Jell and its integration with Slack.
Despite the great usefulness of these applications, when I deepened the research to write the post, I found it very curious that the tools are not very popular among startups. Be that as it may, for a complete list, see the ranking of recommendations from Stacklist . I got the impression that the person who works within the startup should not work by the hour. Hourly work tends to be more of an established business trait, which seems to me to be the reason for the low popularity of this class of apps in lists of recommendation tools for startups.
Conclusion
As you can see, it is quite difficult to distinguish the applications that only intend to keep the team motivated (by sharing each task completed) from more complex applications, whose mission is to generate reports for charging hours. There are many options on the market for whatever point in the journey you are in: sharing status, clock-in and clock-out (check-in) or even the preparation of billing reports.
The maturity of your team and your point in this journey (whether you need to improve how to work or how to charge) will be the most decisive in choosing the software. There is no shortage of options. The hardest thing is to realize what the real problem is that you need to solve.
Everyone who uses a laptop has a natural limitation of disk space. Since, in the smallest computers, disks have ceased to be disks and have become solid ( SSD ), this problem has become much worse.
This happened - more or less - at the same time as cloud storage proliferated. But what was once innovation ended up becoming a commodity. Today there are numerous cloud storage services and the most difficult part has become managing them.

Retiring the USB stick and looking for alternatives
Of course, we liked it when we were able to, almost entirely, retire our USB sticks. But cloud storage has created a number of problems as well. For me, who uses a laptop with an SSD, the biggest problem was always that my disk was small and my disk space in the cloud was larger than what was available on the computer. That's why I've always had to manage this issue with Dropbox selective sync.
The fact is that I never liked selective sync, as you have to enter a hidden panel to select what you want to see at the moment. In addition, he has to wait for the synchrony of the folder. If the file to be synced is large, Dropbox will queue you with no management over.
Whoops! I just saw that I see that it has a "smart sync" plan at USD 199/year.

Dropping Dropbox
By this I mean that I am totally convinced that Dropbox is no longer a place for me. This price is out of (my) reality, so much so that I won't even get to test the service.
Anyway, even though I was a plus (paid) user of Dropbox for a few years, I realized that the company had no plans to solve what for me was a real problem. On the contrary, Dropbox was just creating much more expensive additional services, few of which I was interested in and none that could fit in my pocket. Then the day came to downgrade my Dropbox.
I don't think there is an easy solution to this. My solution was not very easy or rational, as I decided to pay - the same as I already paid in Dropbox - for a service that I used in the free plan. Maybe I did it to get "revenge" on Dropbox and its strategy that ignores ordinary people and those on a budget. At least it ignores people of this type who are able to reorganize themselves and find another better service for the same price. 💪👊
Innovative options: oDrive and Google Drive
The proposal of the oDrive It's simple and has many competitors: it's an application for managing your multiple drives in the cloud. So you can have several Google Drive, Dropbox, etc. accounts on your computer. In my case, I had a Google Drive account at work and a personal one, so I always had to choose one of them. I can now have all the accounts simultaneously on my laptop, making use of what some call "cloud unification".
What about the paid plan? The paid plan of oDrive allows you, in addition to syncing multiple accounts, to have the option to unsync each of their folders. The usability is perfect and you can navigate through the folders choosing what to download and what to return to the cloud, freeing up your precious disk space on your laptop.
Well, it's still an expensive service without a doubt. A competitor named ExpanDrive It seems to offer a more affordable plan. It is no coincidence that the price of oDrive is the same as Dropbox's mid-range plan, which reinforces that it is a reference for the market. The fact is that at least now I subscribe to a service that seems to be aligned with my interest. My interest at the moment is to explore Dropbox's free plans and its con 😇
And, for those of you who have a corporate Google account, there is the File Stream , which solves a similar problem at no additional cost. The problem that the tool solves, in fact, is that of selective synchrony, not that of managing multiple accounts. But, as the space provided by Google is quite generous, it is a possible solution for you who want to keep your notebook's disk space in order.